Recommended
6 Reasons why a bespoke website solution wins every time
Dave Ramrekha
In the digital age, where online presence is a cornerstone of success, the battle to captivate your audience's attention begins with your website. In this...
Any good web developer will know what goes on under the hood when a user enters a web address into a URL bar and hits "go". In fact, it's now a common interview question. In this post, we'll have a look at exactly what happens during the web request process.
Terminology
The first thing you need to know in order to understand how a web request works are the following definitions:
- Web server - the software on a server that allows it to receive and process incoming web requests
- DNS - short for domain name system, which is basically just a phone book that maps domain names IP addresses (we'll get into this later)
- Response code - numbers that identify different types of HTTP responses (commonly known ones are 200 for OK, 404 for Not Found, 301 for Permanent Redirect, and 500 for Internal Server Error)*
Step 1: DNS Lookup
In reality, all web addresses are actually just strings of numbers called IP addresses that look something like this: 216.58.198.174. In fact, if you paste that address into your browser, you'll notice Google loads up. The domain name (google.com) is just an alias that allows users to remember web addresses a lot easier.
So when a user visits a domain name (such as google.com), the browser will query the DNS to retrieve the IP address that the domain is mapped to.
Think of it like the phone book on your mobile. Instead of having to memorise Dave's phone number, you can save his number in the phone. Then you can simply tap "phone Dave" and have your phone automatically look through its database and get his number for you. In this analogy, Dave is the domain name, his phone number is the IP address, and the phonebook is the DNS.
Step 2: The Request
Once the browser has retrieved the IP address from the DNS, it can then proceed to assemble a web request. This web request will contain a header, and can also sometimes contain content (such as form data when the user is submitting a form).
The request header will include the following attributes:
- Request method - typically either GET or POST. Usually, the request method will be set to GET when simply retrieving information (such as viewing a web page), and POST when submitting a form, or sending data (for example when logging in, or creating a post)
- Request URL - this is a full URL which tells the web server which page the user is requesting
- Protocol - this will contain the HTTP version (which is usually 1.1)
When combined to make a web request, it'll look something like this:
GET /about.html HTTP/1.1
Other information can then be added below that to provide other information about the request. These come in the form of key-value pairs, which means each piece of information will have a key (an identifier) and a value (the actual piece of information). Examples of this include information about the user agent (which contains information about the user's browser), cookies, the content type, the host (which is the domain name in this context), and more. A full HTTP request will look something like this:
GET /culture/anatomy-web-request HTTP/1.1[CRLF]
Host: viacreative.co.uk[CRLF]
Connection: close[CRLF]
User-Agent: Mozilla/5.0 (Macintosh; Intel Mac OS X 10_11_3) AppleWebKit/537.36 (KHTML, like Gecko) Chrome/55.0.2883.95 Safari/537.36
Accept-Encoding: gzip[CRLF]
Accept-Charset: ISO-8859-1,UTF-8;q=0.7,*;q=0.7[CRLF]
Cache-Control: no-cache[CRLF]
Accept-Language: de,en;q=0.7,en-us;q=0.3[CRLF]
Step 3: The Response
After the web server has retrieved the web request, it will generate a response. Similarly to the request, this will contain various pieces of information, including (but not limited to):
- A HTTP response code (see terminology section above). If the request was successful, this will typically be 200 which means OK
- The date that the response was generated
- The HTML content of the web page
A typical HTTP response may look something like this:
HTTP/1.x 200 OK
Transfer-Encoding: chunked
Date: Mon, 19 Dec 2016 15:32:21 GMT
Server: nginx/1.11.5
Connection: close
Content-Type: text/html; charset=UTF-8
Content-Encoding: gzip
Vary: Accept-Encoding, Cookie, User-Agent
The content type field will tell the browser what kind of content to expect. In this case, the content type is simply HTML, so the browser knows it needs to render HTML. The content type could also be an image, or a video, JSON, or more. This field basically just tells the browser how to handle the content its receiving.
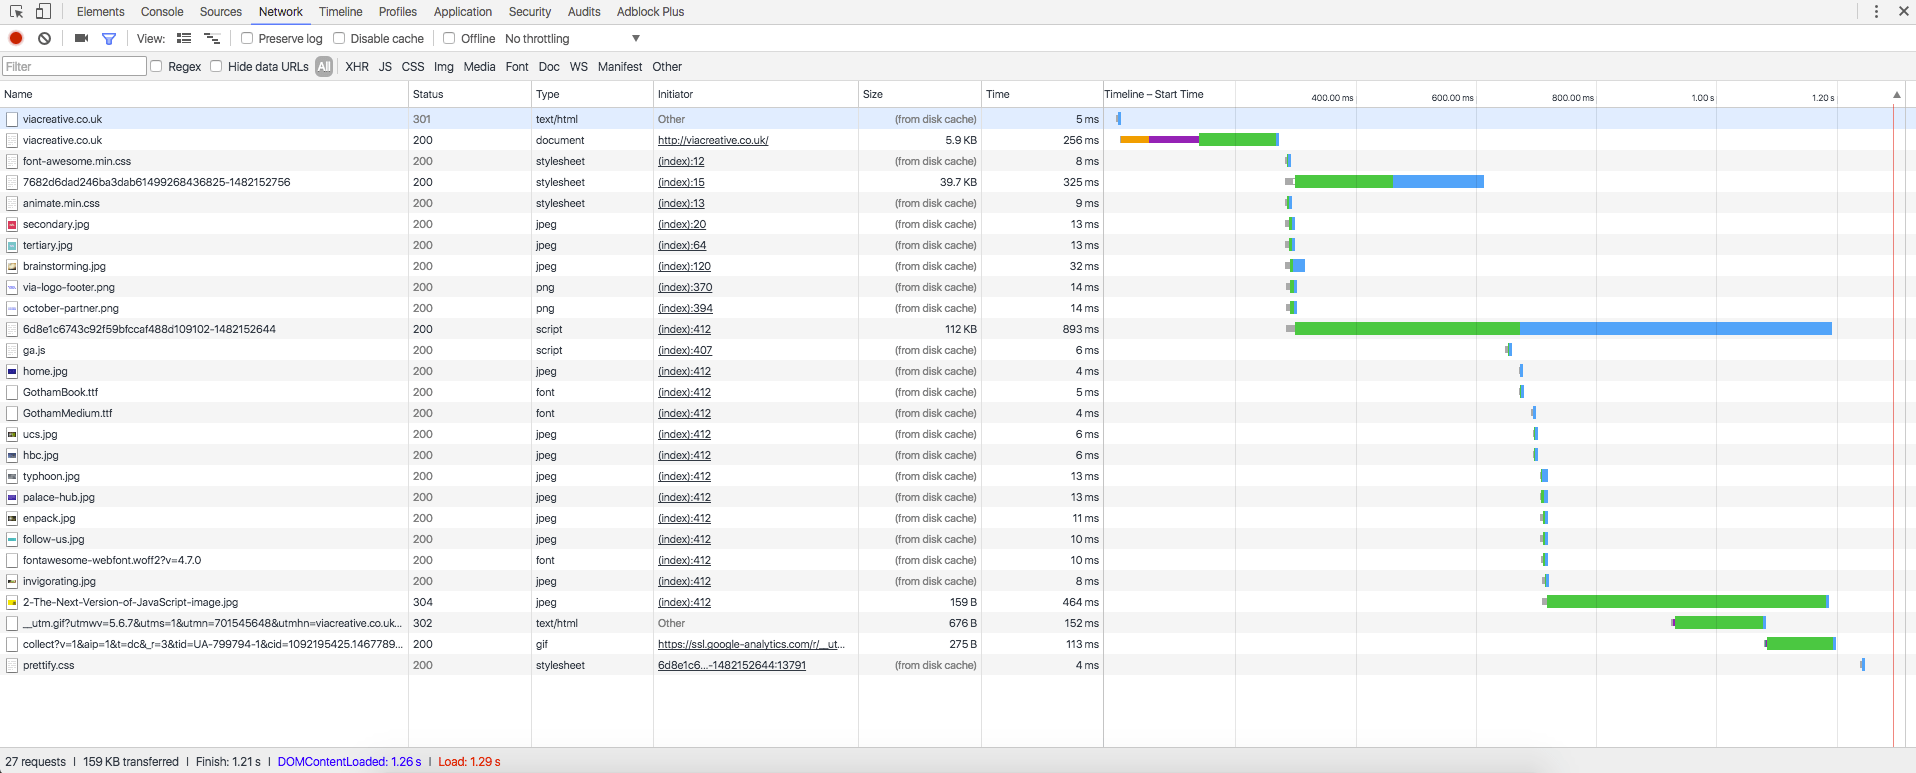
If the HTML contains assets such as images, videos, fonts, or external CSS/Javascript (which it usually does), the browser will then send off subsequent, "embedded" requests to the web server to retrieve each of the assets and place them into the page. If you open the DevTools in the Chrome Browser and visit a website (such as viacreative.co.uk), you'll see all of the requests as they happen.
Conclusion
So that's really the essence of it – you now have a basic understanding of HTTP web requests! Of course, it gets more complicated; especially when it comes to form submissions and file uploading, but that's an article for another time.
* One of the lesser known HTTP status codes is 418, which means I'm a teapot. Don't believe me? See for yourself.


Comments
Goatsy
9 years ago
Good read - thanks!
Liame
9 years ago
Favorited this so I can refer to non-technical people that want to understand the very basics. Very clear and well written!
Terry Harvey
9 years ago
Glad you liked the post, thank you for the kind words!
Asif
9 years ago
Post is very clearly written, it would be better to tell more about response headers i.e
Content-Encoding: gzip,
Cache-Control: no-cache[CRLF]
what is this and why it used?
Terry Harvey
9 years ago
Thanks Asif! Yeah, I wanted to keep this post simple so non-technical people could understand it, but this seems to have been requested quite a bit, so I'll think about possibly writing a "sequel" to this article that goes into more technical detail.
Larry D'Almeida
9 years ago
Great post! Very informative.
Briggens
8 years ago
Awesome post, super simple and easy to understand. Way easier than a CCENT book I read a few months ago explaining the same concept. I also love this simple comment box down here. No need to sign in, or to click a button to "expand comments"